smj
Forum Guide
  Traditional Council
Posts: 1,819
|
Post by smj on Jan 20, 2007 9:44:23 GMT -5
The prognosis is fine! I just have to heal up a bit. I have a 4 inch cut on my back, and a nearly 4 inch cut on the middle of my gut to heal up. I get those closed up and done with I should be just dandy again. For now, I look as though I've been run through with a sword!
|
|
|
|
Post by BT on Jan 20, 2007 23:08:22 GMT -5
This is the elk gods pay back to you!  Well....I am sure glad to hear all is well and your on the mend  Does this mean you'll have more time to sit around and write story's and articles?  If so....maybe you should take the time to broaden out that Elk season story so that it can be submitted to some of the magazines out there  |
|
|
|
Post by easternhunter on Feb 26, 2007 22:13:09 GMT -5
SMJ...sorry to hear about your surgery and the demise of your bow...This is one sweet build-along!
As we speak, I too have just taken my first glue-up off the form tonite...I fear my glue-lines are too much, but I'll know more when I do the clean-up.
I'm doing a hickory backed maple with 1/8" actionboo core.(gotta start somewhere)
Now that I've got a rough glue-up, anybody got a good template to make something in 50-55lb -64" ntn??
|
|
smj
Forum Guide
  Traditional Council
Posts: 1,819
|
Post by smj on Feb 28, 2007 8:39:53 GMT -5
Howdy easternhunter! Surgery was fun, as always, and I go to see my doctor today and find out if I am released to go do stuff again. With any luck, I can put this chapter behind me! Anyway, I have actually brought the bow I was working on back from the dead. I reglued the tip that broke and then was able to cut the limbs shorter so that the stressed part of the tip is now mostly trimmed off. It dawned on me that I had material to work with, and will probably end up with a bow about 62 to 64 inches. I think it will work... should work long enough to get a few arrows through it anyway - but not a bow I'd ever give away to anyone. One potential issue is that as the bow shortens, the positioning of the grip gets messed up a bit. I like a 66 to 68 inch bow and like the grip 1 inch above the center line and 3 inches below. This makes the upper limb longer than the lower limb. As you shorten the bow, this distribution should change a bit - but this is hard to change on a bow that is already glued up. This has to do with how the bow sits in the hand, so I may have some balance issues pop up. I also have a hinge to work out, I guess the bow didn't like my chopping its limbs off like that! My goal is to come up with a 40 to 45 pound draw at 28 inches and hope to post a few more pictures after this weekend.
As to your bow - SWEET! I have not gotten around to making a maple bow yet, but it is on the list to do! Post a couple pics for us! This should be a great combination... Did you do an R/D design? So far as template goes, I tend to trace a pattern on to the backing and cut it out prior to glue up. This gives me my outline for the bow and I find it easier to get a nice smooth, and well centered, flow from the grip to the tips. (Although this is not necessary by any means!) As to draw weight, due to the variability of the materials used - meaning wood! - you can't really expect to pattern the taper for limb thickness. Is this a first bow, or have you made others? Did you taper the bamboo and the hickory backing at all prior to glue up? Just curious! Also, how thick is the hickory backing? Give us some details!!!!!
|
|
|
|
Post by easternhunter on Feb 28, 2007 11:30:25 GMT -5
SMJ, yup, I did a r/d 66". The boo was tapered, but I ignored the backing..(big mistake!  Once I took it off the form I KNEW I had to taper and thin that hickory. I'm aiming for 50-55lbs at 28" The bow actually looks better than I hoped.. almost lost it to the table saw with a slip tho, but i saved it I think.  Since I thinned the backing, the limbs are already coming around abit. I floor tillered it with a couple of inch flex just to check. I put 1.5" deflex in it but didn't take into account the fades, so I think I got the sweep abit close to the fades. I notice that you got nice curves in your deflex, mine came out kinda abruptly. Let me know what you think of her. I can take any help I can get. OK, try linking to this..http://s179.photobucket.com/albums/w301/Easternarcher/ |
|
smj
Forum Guide
  Traditional Council
Posts: 1,819
|
Post by smj on Mar 1, 2007 12:35:22 GMT -5
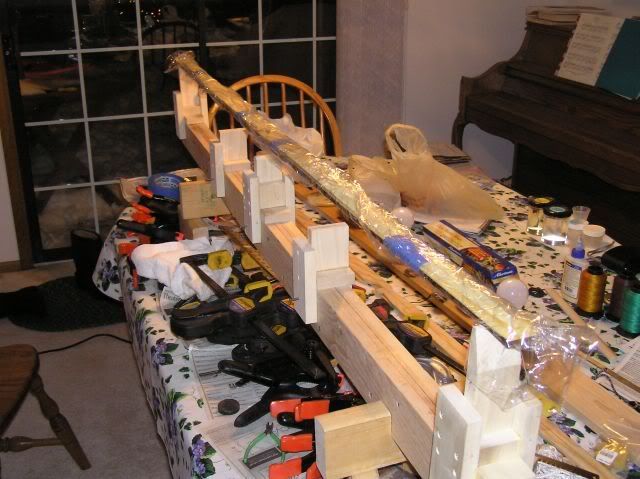
Here's yours...  Take a look at my jig...  The middle of the bow is just a standoff, not a section of board. This allows the wood to flex a smooth arc through the grip section. It looks like you used a board for the grip section, and then bent the limbs off the end of the center board... This leaves the center flat. I prefer to get a nice even curve through the grip and as stated above is how I do it. The jig take a while to put together, but we could do a jig build if folks would like... Also, I think the bow draws and shoots a bit smoother when curved smoothly through both the deflex and reflex sections. You will find it easier to place the grip block on the belly, and it may or may not shoot a bit faster depending on how you tiller it, but I am willing to bet it will have a bit more hand shock than one made of the same materials but curved through the grip. Your tree looks ready to go! If you don't put a long block for a grip on the bow, I'd try to get some flex through the ends of the flat section if you can. Although, to much flex and the block may pop off! Hmmmm... You may be better off just tillering off the flat section at that - but do try to get the length of the limb in play when drawing! That flat may also limit the draw length you get out of it before stack sets in - although you said you want 28" and you should be able to get that. Try to get the flex through the limb the way you want it before reducing draw weight. Once you have the flex you want and the limb looks ready to work, then reduce it to the correct draw weight. You are at the fun part now! Go slow, don't cut off to much at any one time. Also, before to much floor tillering goes on, get those limbs roughed out with nocks on them! Make sure the center line is through the middle... By the way, with an R/D bow, you can tape a thread from tip to tip with the bow sitting on its belly, then put it under a strong light directly overhead. The threads shadow will show where the center line goes. You might mark that line, too! Keep us posted! |
|
|
|
Post by easternhunter on Mar 1, 2007 14:29:21 GMT -5
Although it looks like a looonnng flat section, it is actually only an 8" block supporting the belly and I tried to get the limbs to flex soon after that. I'd love to see a jig-build or maybe send me the specs so I can build one for my next bow.
I figured that a rigid flat area would be easier to get a riser block to fit well. The limbs have been roughed in and tonite it's time for tip overlays and nocks! I have a steel yard stick that I can bend to fit the curves for centerline....a lazer line would work well I suppose too.
thanks for the tips BTW...
|
|
smj
Forum Guide
  Traditional Council
Posts: 1,819
|
Post by smj on Mar 1, 2007 23:11:59 GMT -5
I don't really have any plans that I can send you for a jig at this point in time. I have thought about drawing some up in AutoCad though, and I might just do that. It would simplify things a bit... This weekend I'll get some close up pics of my setup and try to show how I did mine. I've seen these done different ways, I think everyone has a better idea but there are a couple of things that end up common to all of them. I'll try to point those out, and I'll give you what distances I place my standoffs, too. Given all of that, you should be able to play to your hearts content - or until you find those majic dimensions that make the bow you really like!
Good luck using a metal rule to find the center line. There are some problems with that, I've tried it and found it less useful than one might think.
Flat is easy to mount to... If you get flex though, and a bad glue job, it could pop the grip off. The big tip for doing a curved grip is to just make sure that the belly of the bow is 100% flat before you bend it over the jig. Then you have to shape the grip block to what ever curve you end up with. If the belly of the bow is not flat - you have to shape the grip block and the belly wood, too. You get close, but it is tough to fit just right! So, I say make the belly flat and let it flex! Try one - make a coupe grip blocks out of something easy to work like pine. Just to convince yourself that it's not that tough to do, then make the one you want to put on.
Post us some more pics as things come along!
|
|
|
|
Post by easternhunter on Mar 2, 2007 7:01:32 GMT -5
Great tips there SMJ....for some reason, I'm finding the grip the hardest part of this whole build! Drives me crazy.
Tried the steel rule last nite, and you are right...it ain't exact when dealing with curved limbs etc.
Oh well....live and learn alot!
|
|
smj
Forum Guide
  Traditional Council
Posts: 1,819
|
Post by smj on Mar 3, 2007 9:15:16 GMT -5
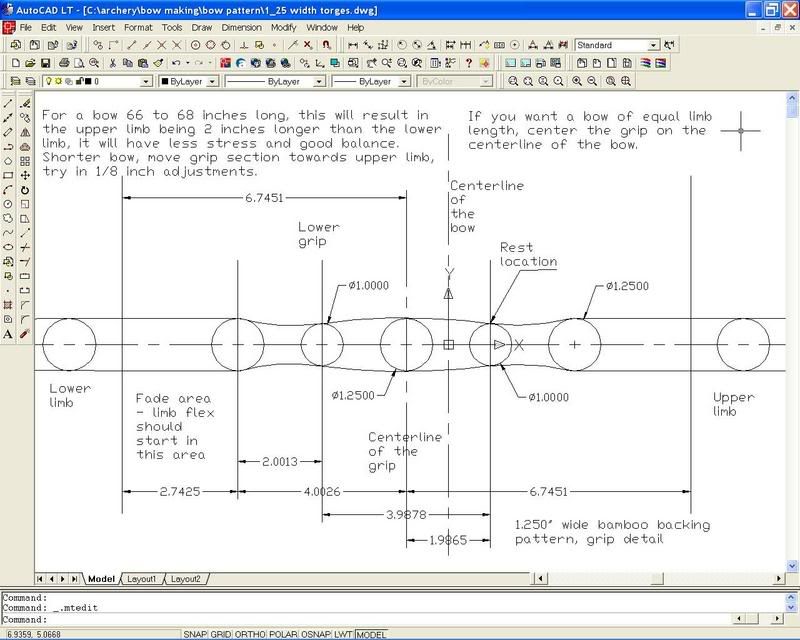
Hey eastern... Here is a grip example for you... We'll see if anyone can actually read it! If this comes up way tiny, I'll email the file capture to you for your review. You can make just about any variation to this that you want. This type of grip ends up being round through the grip section. Let's see if this looks any better! Hmmm, I see I forgot to snap to the lines... Hence, the distances are weird numbers, like 6.7451 is really 6.75! Also note that the board width should be cut with ~.125" of additional width on either side of the bamboo for the lower 2/3's of the limb.  |
|