|
|
Post by CopperHead on May 15, 2008 0:02:54 GMT -5
SMJ, These bows are very very beautiful. You should be very proud of the work you do.    |
|
smj
Forum Guide
  Traditional Council
Posts: 1,819
|
Post by smj on May 16, 2008 20:32:42 GMT -5
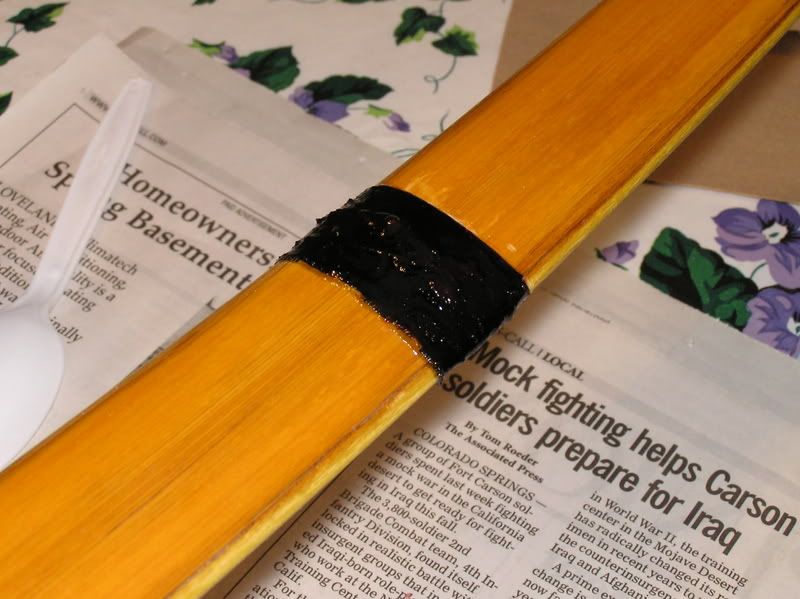
Thank you for the kind comments on the bows... I need to deliver one here shortly though! So how to fix... We started by gluing the strip of bamboo back down. Then, I thought I'd put a limb wrap around it at the node where it broke so that we don't have to worry about it popping up again. What to wrap with? I wanted linen - but could not find real linen locally. So - I found some silk. I wanted silk chord, but settled for silk material. Probably silk over nylon or something.  I thought that would look very good on the bow, but was not sure just how dark it might get once I glued it on... Lets find out! I cut a narrow strip to place over the area. I also found out that this material runs and frays like crazy! It is horrible stuff to work with! Oh, well. I decided to try to stain the bow first, then spray a bit of lacquer on the top to keep the dye in place. Where the repair goes, I put tape over the area to keep the lacquer off - I don't want glue sticking to lacquer, rather, to bamboo and osage!   So this goes on first and gets trimmed to limb width. Then I will wrap a quarter inch strip of material over the top to snug it all down. For glue, I used Bow Grip since it is clear. To keep from getting glue over everything, I masked the repair area off with tape.  Once the wrap is in place, remove the tape while the glue is wet. It will be hard to sand very much without getting in to the dye that was put on before doing the repair.  Still, as you can see some clean up will be required! Not sure about that just yet... I will put another coat of glue over it as well. A word about using dyes on bamboo.  I put the dye on with cotton balls. Sometimes I thin the dye, other times full strength, depends on the effect you are looking for. The dye I use gets mixed with alcohol rather than lacquer. You have to pick the one you want to work with. I like to work with alcohol because once the dye is on, you can touch up. These dyes also mix with water, don't go there as the bamboo will suck it up! I like to put it on heavy and then rub it down until I get the effect I like. I also use the cotton ball because I am not looking for an even application. I buff the finish down to take off some of the excess dye before applying any finish - the dye will rehydrate with the lacquer a bit and move around on you. By buffing first, this is reduced. Also, make certain that the dye is very dry! That also helps to keep it put! Once buffed, and before the lacquer, if you only want the bamboo to be dyed, you can touch up with sandpaper to remove any dye that got on the wrong spot. You can always make sanding tools to help out! These allowed me to get right to the edge of the bamboo to make a clean separation between belly and back.  I like to spray a bit of finish on first, then brush on something heavier to finish the bow off. I have not found a way to brush on finish over dye without first coating it over with a light spray. |
|
smj
Forum Guide
  Traditional Council
Posts: 1,819
|
Post by smj on May 16, 2008 20:39:29 GMT -5
PS - the ipe bow is done and ready to go. No more messing around with it... Soon as this one is done, I'll pop them in the mail. I would like to shoot 100 rounds through the osage bow prior to shipping, so this might take until Wednesday to ship.
|
|
|
|
smj
Forum Guide
  Traditional Council
Posts: 1,819
|
Post by smj on May 17, 2008 22:57:56 GMT -5
So - I cleaned up the repair, sanded it down a bit, and brushed on another layer of epoxy. If I do this a couple more times, I can have the repair as smooth as glass. But it will take a day for each application and sanding down... Or I can slap on some lacquer tomorrow, shoot the bow on Tuesday and ship both of them out on Wednesday - your call, sir. As you can see, I was able to clean things up some but it still shows some thread stubs poking out... I'll see it they will sand off once dry. If so, lacquer will cover the sanding marks just fine.  While the repair will make this section of the limb very strong, it also adds mass to the limb and we will have to see how it shoots. It will shoot, but the ipe bow will be much faster, I hope it works out OK for you! |
|
|
|
smj
Forum Guide
  Traditional Council
Posts: 1,819
|
Post by smj on May 18, 2008 23:06:23 GMT -5
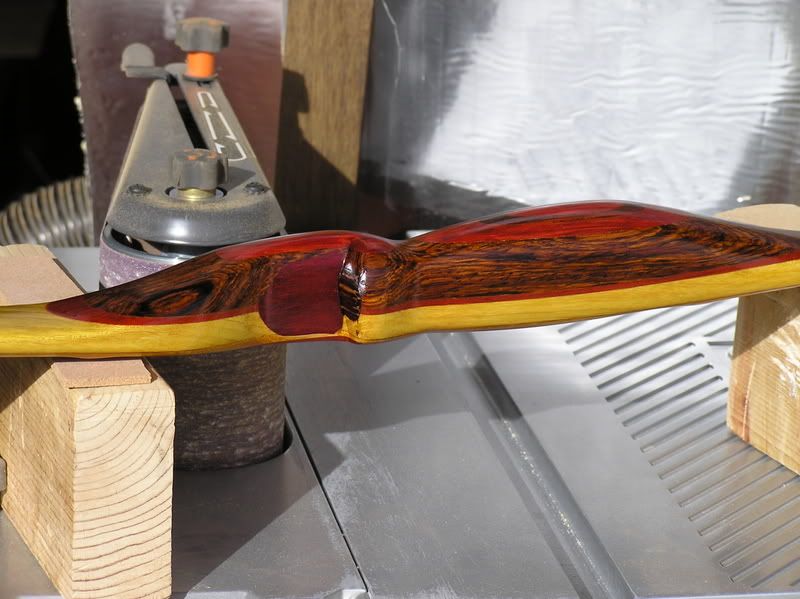
So here is a sneak-peek look at the osage bow -  The repair did smooth up for me, yet looks a lot like black electrical tape... Not what I'd intended! If I could find what I wanted to wrap with, this would not now be the case. Still, it does not look bad - just not what I'd had in mind.     That cocobola really comes to life with a little lacquer on it... Keep in mind that the osage will darken with age. Also, take note that tomorrow I will attempt to shoot about 100 arrows through it. So long as we have no more issues, it will need one more coat of finish and then it is off to Red... |
|
|
|
Post by BT on May 19, 2008 5:16:09 GMT -5
These bows are looking awesome  |
|
red
Forum Guide
 
Posts: 1,501
|
Post by red on May 19, 2008 10:54:21 GMT -5
Wow, the lacquer really made those colors "pop".  |
|
smj
Forum Guide
  Traditional Council
Posts: 1,819
|
Post by smj on May 20, 2008 9:23:38 GMT -5
Well, how to put this... The ipe bow seems to have wanted to be a bow from the time I cut it from the board. The osage bow has fought me every step of the way. I shot the osage bow, after the repair, 20 or 30 shots at half draw. Seemed solid enough. I shot it another 15 or 20 rounds at 3/4 draw. Again, seemed good enough. Then I shot it at full draw - on the second shot it made some noise... Nasty noise that should never ever come from a bow... The third round at full draw turned out to be a bad one. The limb not only re-broke at the same location, but the lower section came off the bow and flew across the deck. There is no hope of repair at this point. In looking at the wood, the inner limb right at the spot where the bamboo popped up, has a powdery appearance in one spot. I don't know how else to explain it, I tried to photograph it but can not seem to catch it with the camera. You could not see this from the outside, I didn't catch a hint of any problem while working the bow. There was no hing at this spot, that might have worn the internal limb, either. It looked fine all the way around. About the only thing I noticed about this bow was that it shot very slow. It had a lot more reflex than the ipe bow and was within a few pounds of the same draw weight at 27 inches. Still, the osage bow shot very slowly compared to the ipe bow. I could not explain why it shot so slowly, it should have been rather zippy, and given the ipe bow a run for its money! But it didn't, and perhaps this failure had something to do with that. It turned out a beautiful bow, and I had a great time trying to coax it to life! There is no remorse here, somewhere there is another osage log or limb or board trying to get to me, because it wants to be a bow! I will look for it, until we find each other. I have never tried to build the same bow twice - however - I will keep this bow and see if I can't remake it, Red, and should that happen and turn out well - I will send it to you! First, I have to find some more osage somewhere... My source here locally has dried up, so the search for affordable osage is on!
The ipe bow is in the mail, they said it will arrive Friday. I strung it a couple of times and shot it over the last couple days. Yesterday, I strung it up and shot 50 rounds through it, then without unstringing it, took it down and measured the draw weight at 27 inches - I had 53 pounds. Upon unstringing it, I could not see where there was any loss of reflex in the limbs. I did not get to shoot it through a chrono, it was broken when I stopped by Archery in the Wild yesterday. However, it shoots a 9 or 10 grain per pound arrow well and hits hard! This is the first bow of this pattern that I have built, I hope it works well for you. The limb mass is slightly moved back toward the first 2/3's of the limb, and the tips kept a bit thin farther back along the limb. While I was at Archery in the Wild, we talked about what arrow might work best for this bow at your draw length. To keep the right weight, we'd both though that cedar shafts might be your best bet. However, with a 210 grain tip, you just might make those carbon shafts work... Certainly worth a try! Also, there are various means of adding weight to an arrow these days, I am sure we can figure something out! Worst case, a full length 5575 GoldTip Traditional with a 145 grain tip didn't shoot to badly...
|
|