|
|
Post by easternhunter on Feb 27, 2007 7:20:06 GMT -5
Can't see the last set of pics Cedar....just a box with a red X..
|
|
|
|
Post by michihunter on Feb 27, 2007 14:00:37 GMT -5
I see em here Eastern.  |
|
|
|
Post by BT on Feb 27, 2007 23:26:56 GMT -5
Great follow up! Now I can do it  Thanks F.C.! |
|
Coca Cola
Board Regular
 Formerly, upthere.
Posts: 406
|
Post by Coca Cola on Feb 28, 2007 7:05:06 GMT -5
Great tutorial , thanks!!!!!
|
|
FlyinCedar
Junior Member
 Takin a break on patrol
Posts: 280
|
Post by FlyinCedar on Mar 2, 2007 1:14:08 GMT -5
Ok...lets get this string served.....its up to you how much serving you want to put on, but I only put enough to have a nock and a place or my fingers....most strings probably have more serving than I use. For this, we are going to use nylon serving, which is my favorite..be careful if you use monofilament serving, as one wrong move can makethe whole thing unravel.. Also, these arenet the best picsin the world, so bear with me. First, let out 1-2 inches of serving, and lay that on top of the bowstring.....It doesn't matter if you start at the top or bottom of the area you wish to serve...  Now, start turning your serving tool around the bowstring, wrapping the serving OVER what you just laid on the string...adjust your tool so that the tension keeps your wraps nice and tight...but not too tight, or the tool will break the serving. Also, if you start turning the tool and it is wrapping in the oppesite direction you want it to go, simply unwrap what you just did, rotate the tool 180 degrees, and start again....it should go in the proper direction now. Keep wrapping the string until you reach your desired serving length (usually 7-7.5 inches) Now its time to finish it off...to do this, we do what it called Backserving...I will try to explain theis so it easy to understand...bear with me... Once you reach your desired length, hold the serving in place, and pull your thread out of the tool, so that you can make a large loop...about 10-12 inches of material....hold the loop, and place your serving tool on the OPPOSITE side of the string...  Now, cut the string at the serving tool. With the end of the string you just cut, wrap UNDER the loop, and back TOWARD the area that you served, for about 5 or 6 wraps.....  Once that is done, lay the tag end on the large area that you served. Now, begin serving again from the large area, where you started the loop. As you do this, you will notice that the far end of your loop is unwrapping from the bowstring. When you get it all wrapped, pull on the tag end to tighten it all up....  Now you can simply cut off the tag end of the string at the serving, and you have a finished serving....  I wish I could just make a video and show you this, it would be much easier. Please ask questions if you dont understand, as the backserve is kind of hard to explain...your questions may help me explain it a little better. Thank You |
|
|
|
Post by easternhunter on Mar 3, 2007 20:54:34 GMT -5
BYGOLLY, ICAN SEE THE PICS NOW!!!! GREAT INFO....THANKS CEDAR! ALWAYS WANTED TO TRY THIS.
|
|
smj
Forum Guide
  Traditional Council
Posts: 1,819
|
Post by smj on Mar 3, 2007 21:02:00 GMT -5
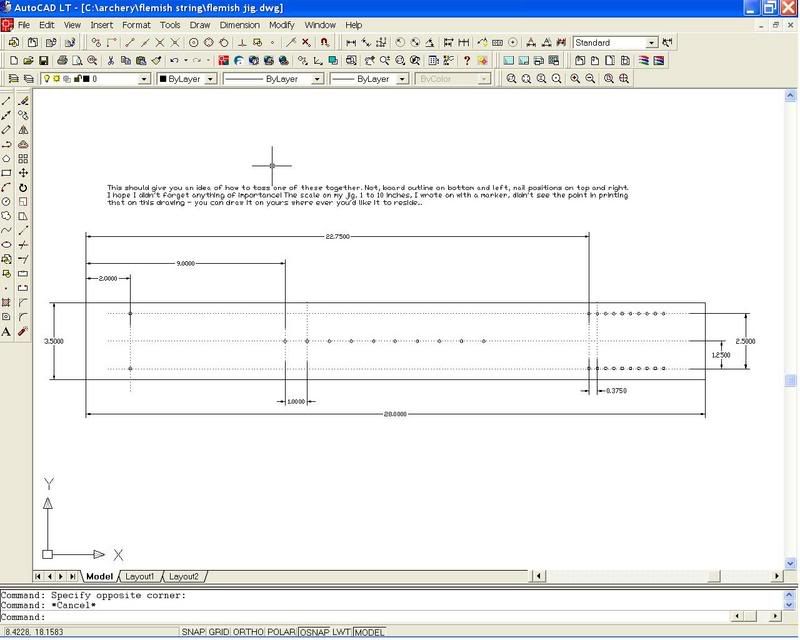
If anyone would like, I can post an AutoCad screen shot of how to layout your own flemish twist board. I did my own, and am willing to share if anyone would like. I made mine on an old section of oak board that was otherwise just laying around, and had been given to me by a friend of mine who was trying to unload his junk wood... I do like free!
|
|
Coca Cola
Board Regular
 Formerly, upthere.
Posts: 406
|
Post by Coca Cola on Mar 4, 2007 0:47:29 GMT -5
Would you please post that. It doesnt look terribly difficult. Thanks
BTW, great tutorial.
|
|
|
|
Post by BT on Mar 4, 2007 11:15:24 GMT -5
YES! ........ I can definitely build one of these  |
|
smj
Forum Guide
  Traditional Council
Posts: 1,819
|
Post by smj on Mar 4, 2007 22:08:20 GMT -5
So, here is what my jig looks like from the front:  And here is what it looks like from the back... a couple felt feet...  And, hope you can read it... Here is the drawing I mentioned before. Please take note, this design has been copied a few times and I think that a 68 inch string really comes out at 66 inches... so make a string and measure it. Strange as it may sound, I just make them to fit my bow and I noticed the peg is at 68 inches, but I've been making 66 inch bows! Besides, the length is going to depend a lot on how much you loop over and braid back together to form the loop. All I am saying is that string lengths may vary a bit! Don't panic, remark, make another!   |
|